Tuesday, August 22, 2017

From Narrow Hem to Faced Hem Band, Other Hints for an A-Lined Skirt, and Valori Wells Pattern

I really enjoy using Valorie Wells Sewing Cards.  I have the Little Wallet and the little bit bigger wallet, two stuffed animal patterns and the Everyday Skirt.  Today I want to address the Everyday skirt.  Another day I will talk about the Little Wallet.  I think that one is a fantastic, simple pattern for gifts.

But anyway...on to the Everyday Skirt.
Pattern can be purchased here.

This pattern is the size of a small greeting card and holds all the necessary information to make a really cute skirt.  I could certainly figure out how to make this skirt on my own without the pattern but, WHY?!  She has everything all figured out for me.  I don't have to do any math.  The black and white pictures are sufficient to help understand her directions.  All in all it is a nice simple pattern with great results.

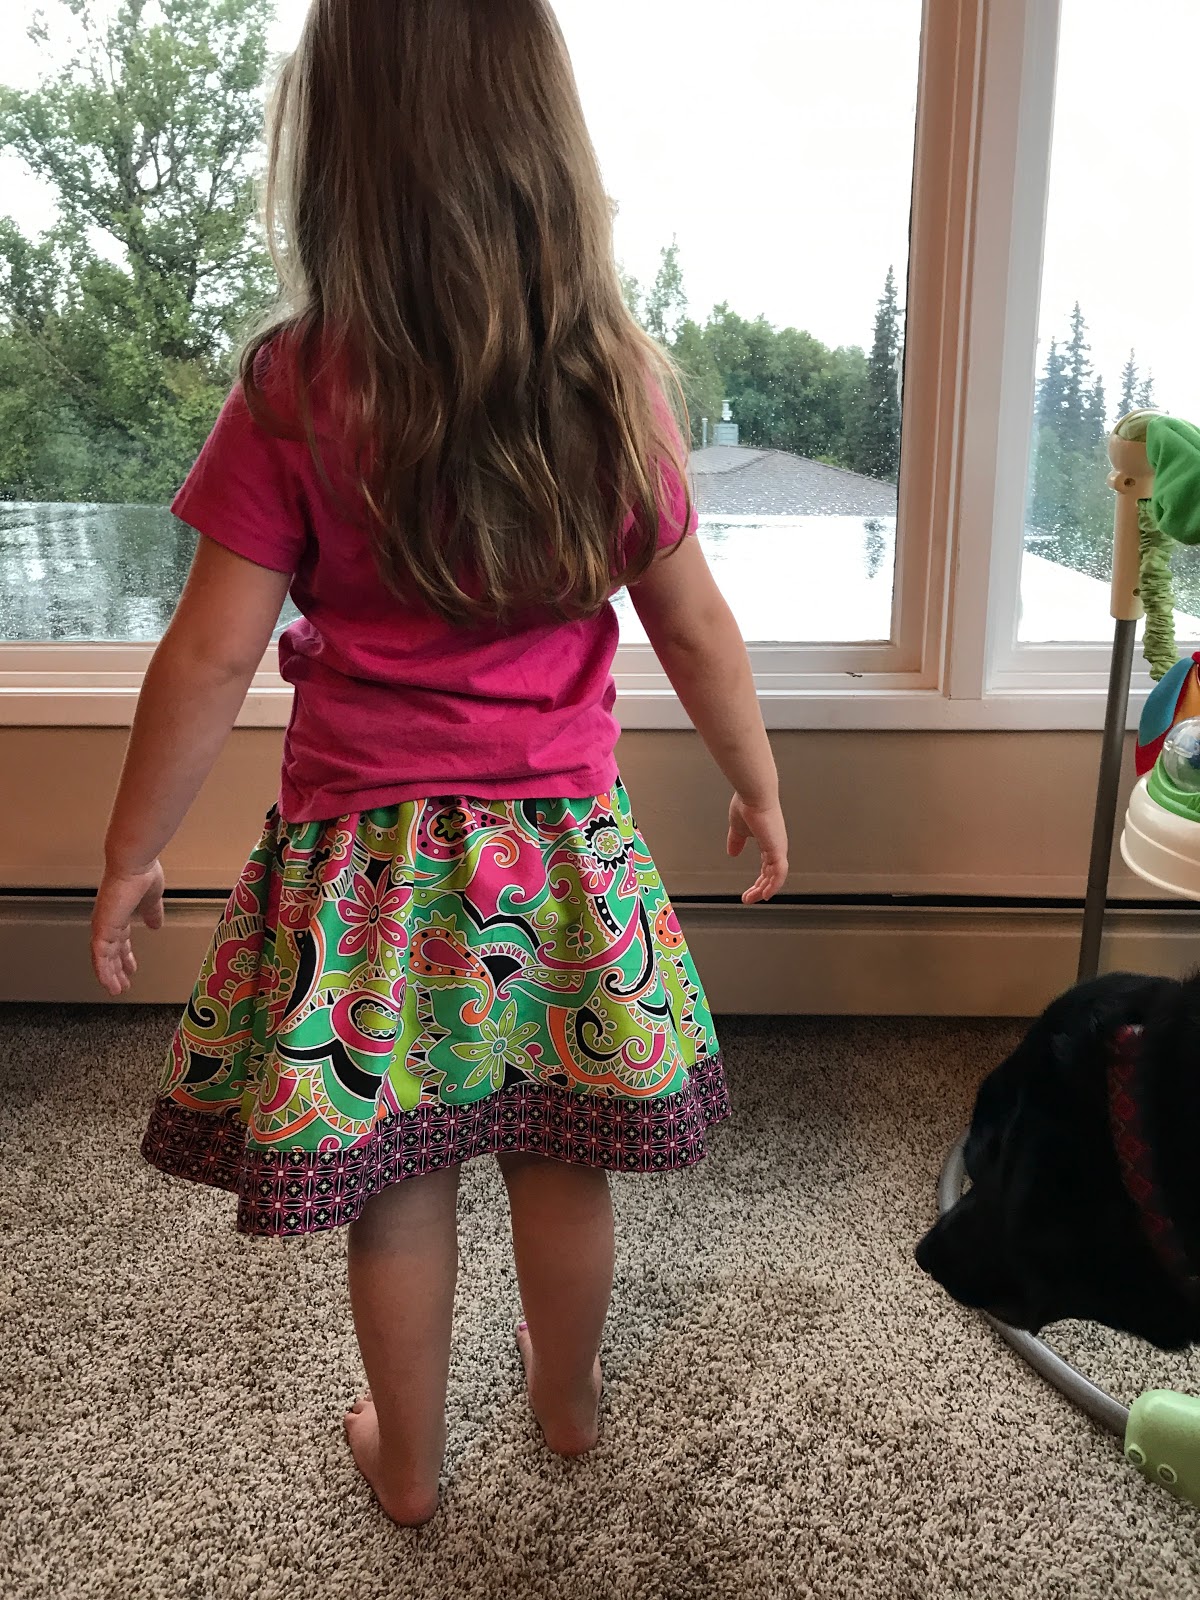
My daughter thought these two fabrics together were Matilda Jane-esque.

I wanted to give a couple of helpful suggestions with pictures for this pattern.

She has you cut out your main skirt fabric as a two large rectangles.  Then you measure over 4" from each side.

Next, cut a diagonal line from the mark to the bottom corner.

Do this on both sides so the finished product looks like this:

I then folded the fabric in half to make sure the sides were mirror images.

Obviously, this technique could apply to any A-lined skirt.

Next hint:  The waist band is attached a little differently.  She has you place the Right side of the Waistband against the Wrong side of the Skirt.  The picture below shows this.  After stitching flip the waistband to the right side and stitch down.  Not the way I would normally do this but it has a nice finished look.


The rest of the pattern is pretty easy to follow so on to the hem band.

In the pattern you are to add the band and sew a narrow hem to finish.  But, I don't love the look of a bottom band with a narrow hem.  

This band is perfectly acceptable.  I just don't love the line of stitching at the bottom for the narrow hem.  To me, it looks like too many lines of stitching.  I know that from far away it isn't even noticeable but I notice it and so I like to eliminate it.  

You will have to do a little math for this.  I know, this takes away a bit of the simplicity I loved about this pattern but for me the finished result is worth it.

In the pattern you are to cut the band 2 3/4" wide.  There is a 1/4" seam allowance attaching to the skirt and 1/2" for the narrow hem.  This leaves a 2" finished band.  

I want a similar 2" finished band.  Since I want it finished on both sides I need to add another 2" for the inside and 1/4" seam allowance for both sides.  My new bands needs to be cut 4 1/2" wide.

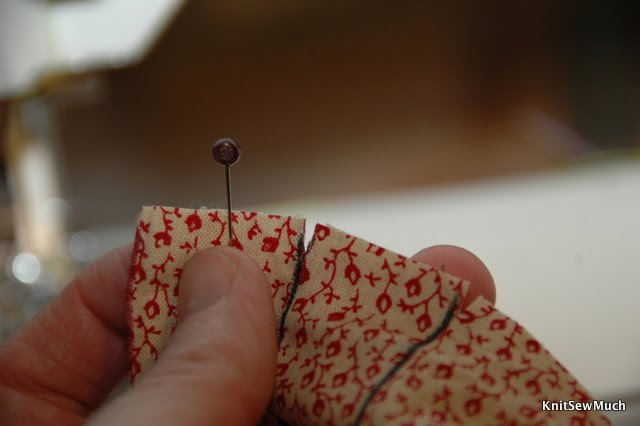
Cut two bands and iron them in half, wrong sides together.

I personally prefer to iron flat pieces so I seamed the two pieces together after and ironed the portions by the seam again.  Feel free to seam the two pieces together and then iron in half if you prefer.

Your finished product should be a large circle with the right side on both sides.

Pin on side of the hem band to the right side of the skirt, raw edges together.  Stitch.

Press the seam allowance toward the skirt.

Edgestitch close to the seam.  You can faintly see the black line of stitching just above the band.

Now you have a finished skirt with only one seam at the bottom, finished inside and out.  Beautiful!

A couple shots on my little model.


Have a great day!
Until next time...

Tuesday, August 15, 2017

Wood and Fabric Window Valance

     Over the last 4+ years I have missed writing this blog. It hasn't been something that I have had time for but this was still missed.  Time has been marching quickly.

In the last 4 years:
  • Our children have all grown into teenagers.
  • I taught sewing lessons to students of all ages.
  • We became a foster family and went back to bottles, diapers and naptimes.
  • We moved to a new house that needs a lot of fixing up.
  • We took a 6 week, 9,000 mile road trip in a small RV from Florida, up the East Coast, across the Midwest and home to Alaska.
  • I discovered new hobbies. 

     I discovered I like woodworking but I really enjoy coming up with the ideas and having my husband execute them.  I love making signs and crafts with my Silhouette machine. Mod Podge, chalk paint, and Pinterest have become my new best friends.  My love for cooking, baking and trying new recipes has been resurrected.  Phew!  So much to do so little time!

     As I am sure many of you can agree, I LOVE Pinterest and get so many ideas from there.  When I have an idea of something I want to do or make, Pinterest is my first stop. Sometimes I find exactly what I am looking for and sometimes not. When I wanted to make some valances for my very boring large windows, as usual, I went to Pinterest.  I couldn't find exactly what I was looking for.  I wanted rustic.  So I really liked the thought of wood. I also wanted some softness and color from fabric.  Most of the options I found had long curtains like these.

   Here is a great tutorial for making this wood valance from tinpig.com.

And obviously Shanty 2 Chic would have a great tutorial

But what I really wanted was short ones.  I wanted maximum view and light from the many picture windows that surround my living room and kitchen. So I used the above ideas as inspiration for my variation.


The result was just what I was hoping for!  I love a successful project!


Eventually I want to put black metal on the edges for a bit of an industrial/rustic look.  But I have my husband on to other projects. 


Oh, and when I was looking today for my inspiration pins I did find something similar to mine.  Although, they stapled the fabric to the valance.  How nice and easy!  I made a pocket in the valance and attached a rod to the back of the wood.  

This nice and easy tutorial is from Hunt and Host.

Have a wonderful day!
Until next time...

Wednesday, April 3, 2013

Ottobre 3-2009-22 Morris necktie


Ottobre 3-2009-22  Morris Necktie


Pattern Description: A real necktie sewn from cotton fabric.

Pattern Sizing: S, M, L

Did it look like the photo/drawing on the pattern envelope once you were done sewing with it? Looked exactly like the picture.

Were the instructions easy to follow? The instructions were fairly easy to follow. This tie sews together quite quickly.

What did you particularly like or dislike about the pattern? I really liked how easy it was to make this "real" tie. It looks very dashing on my son (with the vest). I didn't like how short it ended up. I wrapped the pattern pieces around my sons neck and it looked like it would be okay but it ended up too short. I was still useable because it would be under a vest. Only the top would be seen anyway.

Fabric Used: Quilting cotton

Pattern alterations or any design changes you made: The first tie I made was a size Large for my son who is about 146 cm tall. When I made a second one for my other son (about 134 cm tall) I lengthened each pattern piece 4 inches. The length was a bit long for my shorter son (we just tucked the small end up inside the bigger end) but would be great for my older son.

Would you sew it again? Would you recommend it to others? I would definitely recommend this pattern. It makes a very nice tie. I am sure that it would turn out nicely in many different types of fabric.

Conclusion: A great tie with added length for taller boys if you want a standard length tie. The shorter is fine if worn under something to keep from peeking out the bottom.


Thanks for stopping by!

Happy sewing!

Monday, April 1, 2013

Ottobre 6-2012-38 Herrasmies tweed vest

I know that has been a while since I have posted to this blog.  I cannot belive that it has been almost three years.  So much has happened and of course I am not going to bore you with any of it.   Before my blogging break I was spending more time reading about sewing on other blogs and blogging than actually sewing.  So, I wanted to spend more time focusing on sewing.  But, recently I was searching Pattern Review to get some sewing advice on a few patterns I was interested in making.  I so appreciate all the time that people take to review what they make.  I decided that I really need to get back to reviewing what I make.  It might help someone out someday.  I also really enjoy when people review on pattern review and then link to their blog with more pictures and thoughts.

So, I thought would review some of the great patterns I have sewed up lately.  Right now I probably won't do much more than reviews on this blog.  Once in a while I might do a tutorial.  I have a single welt pocket tute in the works.

So without further ado, here is my review of  Ottobre 6-2012-38 Herrasmies tweed vest.

I loved making this vest.  It went together beautifully!


Pattern Description:
The front of the vest is cut from salt and pepper tweed and the back from a satin with slight stretch. Th front is detailed with small watch pockets.

Pattern Sizing:. 128-170 cm

Did it look like the photo/drawing on the pattern envelope once you were done sewing with it?. Definitely!

Were the instructions easy to follow?. The instructions were okay. I almost always find that I have to read Ottobre instructions a couple of times to understand them. The most confusing part for me was the order of stitching the shell and lining so that I could turn it inside out. It took me a bit but I finally figured that you stitch the shell and lining together at the neckline, front, and front bottom. Then you stitch the armholes. Now, you turn it inside out and THEN you sew up the side seams. Lastly, you pull the bottom through a hole you leave in the lining side seam and sew up the bottom. (I made three sleeveless garments using this method and only on the third one did I remember to not sew up the side seams.)

What did you particularly like or dislike about the pattern?. I really liked how easy the welt pockets were to make. I was a little apprehensive at first so I made a sample. The sample went together so beautifully I plugged on with the real thing.

Fabric Used:. Wool flannel from Pendleton for the shell, a stretch cotton for the back and Ambiance lining.

Pattern alterations or any design changes you made:. I made two of these vests. One the back was stretch cotton and the other was all wool. This turned out to be quite short. I just went with the measurements and made the size that should fit my older son. I didn't actually measure the pattern for length. Silly me! Luckily, I could pass the first one on to my younger son and made another one adding 2 1/2 inches for my older son. It ended up working out perfectly.

Would you sew it again? Would you recommend it to others? This is a great pattern. I loved the look of the vest when it was finished. I probably wouldn't make it in the near future because my boys don't wear dressy clothes very often. But, if they need a vest in the future I would definitely use this pattern.


 This is a close up of the watch pocket.


Hopefully, I will finish that tutorial for this single welt pocket soon.

Thanks for reading!

Happy sewing!

Wednesday, April 28, 2010

Ottobre 01-2005-22 T-shirts For My Boys


My boys have been wanting me to make them something and I have tons of high-tec knits in my stash so I decided to make them some long sleeve t-shirts. Of course I headed straight to my Ottobre mags to find just the right shirt. This was a great t-shirt. It was very easy to sew up and my boys love the fit. I ended up making 3 (the other one is black with grey contrast) and my son who is in the pictures wants more. I think I am done with this shirt for now. Some short sleeve shirts are in order now. Summer is coming and it might be warm enough to wear them. :)

Pattern Description: Long sleeve t-shirt with shoulder yokes cut from different fabric. Bound neckline and contrast cuffs.

Pattern Sizing: 104-128
Did it look like the photo/drawing on the pattern envelope once you were done sewing with it? Yes, my garments looked like the picture.
Were the instructions easy to follow? I found the instructions were pretty easy to follow. I did have to make sure that I marked the shoulder line. More of the contrast goes to the front than to to back. The first shirt I made I attached the shoulder incorrectly. I put more of the contrast in back. For the other shirts I made sure I marked the shoulder line well.
What did you particularly like or dislike about the pattern? It was a great pattern. It went together pretty well. I didn't understand why they put in a zipper. I didn't put one in my shirts.

Fabric Used: high-tech knit from Rose City TextilesPattern alterations or any design changes you made: I removed the zipper. I also used contrast knit fabric for the shoulder yoke instead of the woven the pattern called for.

Would you sew it again? Would you recommend it to others? DEFINITELY! My youngest son has asked for another one.
Conclusion: Great t-shirt pattern. I like the interesting detail on the shoulders. The shirt sewed up very quickly.

Just thought I would leave you with two more pictures. This shows what Alaskan kids do on the first nice day that comes along after a long winter. It is sunny, 45-50 degrees outside, there is still snow on the ground and my kids are having a water balloon fight. My kids are so anxious for summer. Can't you tell. :)

Thank you for stopping by. Have a great day!

Until next time...


Saturday, April 24, 2010

Tutorial: Adding Pleats-Sewing the Pleats

Wow! I can't believe it has been so long. Sorry for the wait for part 3. It has been a busy week (or 2).

On to the tutorial!

1. Fold the pleat in half so that the clips match up.

2. Sew right down the line that you marked for the pleat.
This picture shows 3 pleats that have been stitched along the lines.
3. Keep pleat folded in half and put a pin in right on the fold.

4. Opening up pleat place pin against seam line. This forms the box pleat. Half of the pleat is on each side of the pin.

5. Baste pleats down inside the seam allowance.

6. Iron pleats down.

It should look like this picture when the 3 pleats are finished (I apologize if the pictures are a little difficult to see). The red line is the center front.

Well, that is how it's done. I hope you were able to follow my process.

Thank you for stopping by. Have a great day!

Until next time...

Saturday, April 10, 2010

Tutorial: Adding Pleats-Preparing the Fabric

This is part 2 of a 3 part series on adding box pleats to a garment that was originally drafted without. To see the dress I pleated click here. For part 1 about preparing the pattern click here.

On to part 2--Preparing the fabric

Once your pattern is completed you are ready to cut out your fabric.

On my project I wanted a box pleat right in the center of the dress so I added 1" to the center front of my pattern (right side). The picture below shows my new pattern placed on the fabric. Notice that the CF is not on the fold anymore. I added 2" total to the CF but when I stitch the pleat the excess will be taken out and the original CF will again be the actual CF of the dress. When the pleat is finished I will have 1/2 of the pleat on each side of CF.


After you cut out your pattern make clips at the top and bottom edge of each pleat. The red marks on my pattern shows where I clipped. When you clip make the clips big enough to find them but not enough to go past your seam allowance. In this garment my seam allowance was 5/8" so my clips were about 1/4''.


The next step is to draw your pleat lines. Draw with chalk (not marker) from the clip at the top to the clip at the bottom of each pleat. Note: I wanted my box pleats on the outside of my garment so I drew my lines on the right side of the fabric. If you want your box pleats on the inside of the garment draw you pleats on the wrong side of the fabric.


This picture shows my bodice piece with all the lines drawn in. The wider sections are the pleats.


The red line on the left side is my center front. The black lines on either side (actual center front from pattern piece) will be stitched together and the red line will be at the center of the box pleat. I will show how the pleats are stitched together in the next post.

To prepare the fabric for the skirt all I did was make clips at the top of each pleat because the skirt will not be pleated all the way down.

I hope that this was helpful. Please ask if you have any questions and I will try to clear them up. Stay tuned for part 3 coming soon.

Thanks for stopping by. Have a great day!

Until next time...

Thursday, April 8, 2010

Tutorial: Adding Pleats-Preparing the Pattern

As I promised here is part one of a tutorial on adding pleats to a garment. I am going to use my bodice pattern that I used for my daughters dress. You can use any pattern that you want. The method will be the same.

Note: You can see the white line a few inches up from the bottom. That is where I sewed the front band to the bodice piece to make a full bodice piece. McCalls 6020 had two separate pieces and I wanted only one. This had to be done before I began the pleating.

My pictures were taken after I already used this pattern so you will have to excuse the folds underneath.

Let's begin.

1) This is my original pattern piece. The center front fold is on the right. I drew 4 lines parallel to the center front. These lines are 1" apart. I want the box pleats to be 1" wide and to touch each other so 1" is the spacing that I need to make this happen.

2) I added 1" to the center front. When I cut this out I will now place the edge of the added piece on the fold. This will be my center pleat. When the pleat is made the original center front will still be the center front of my dress. For this pleat I only add 1" because it is on the fold. I am actually adding 2" (1" on each side of the fold) which is the width I need for a 1" pleat.


3) I drew horizontal lines so that I would be able to keep my pattern lined up correctly. I can see through my pattern paper to the grid lines on my board. The center front should be lined up on a vertical line. The two horizontal lines are perpendicular to the center front.

On a pattern without a center front to line up you can always use the grainline.

4) Cut along the first line. Carefully move your piece over 2" keeping the horizontal lines following the same line on the board. Add in paper to fill in the empty space. This is my first pleat (When made into a pleat all that is added will be removed).


5) Make all the other pleats in the same manner cutting on the subsequent lines. Here is my pattern piece with all the pleats added.


For the skirt back I didn't need to add any for the pleats. I just turned the gathers into pleats. I measured and drew lines so that my pleats on the skirt would match the pleats on the bodice. Here is a picture showing where I drew the pleats.


Well, I hope that this tutorial helps clarify how to add your own pleats. It is really easy to do. In the next post I will show how I prepared my fabric.

Thanks for stopping by! Have a great day.

Until next time...

Monday, April 5, 2010

An Easter Dress for My Daughter: McCalls 6020

Every year I try to make my daughter a dress for Easter. It hasn't always happened but this year I was determined to make her one. She needed a new dress (actually she needs a few) and I have so much fabric that it was a no brainer to make one instead of buy one. A month or so the Hanna Anderson catalog came in the mail and this dress immediately caught my eye. I loved the pleated bodice. It wasn't very expensive but since I knew I had fabric I decided to recreate this dress for my daughter.
So, I set out to find a pattern that I could use as a base to work with. I found McCalls 6020Front of my altered dress
Back

Side rant: One of my pet peeves with patterns is how sleeves always look smooth but are really gathered. Why do they always make gathered sleeves anyway! Smooth set in sleeves usually look better. How often do you see a RTW shirt with gathered sleeves? Usually not, but they expect us to always construct home sewn ones that way. I am usually able to ease in about an inch of extra fabric but they often put in many extra inches. I really need to learn how to draft my own sleeves to fit armholes. Or I just need to learn how to take the extra ease out of my sleeves. If anyone knows a good book or tutorial I would really be interested.

Okay, I am done with my little rant now on with my review.

Pattern Description: Below mid-knee length dress with front band, gathered skirt, tulle ruffle on lining, back zipper and ribbon sash or tie ends. Sleeve options: sleeveless or gathered sleeves.

Pattern Sizing: 3-14 I made my daughter a size 8 but lengthened to a size 10. She measures a little less than size 8. The 8 fit her quite nicely.

Did it look like the photo/drawing on the pattern envelope once you were done sewing with it? If I had made it they way they drafted it would have looked like the envelope. I changed my version quite a bit.

Were the instructions easy to follow? I didn't use them too much. I did like their instructions for lining the bodice and sleeve construction.

What did you particularly like or dislike about the pattern? I picked this one for the square neckline.
Fabric Used: cotton with a little bit of stretch. The stretch wasn't necessary. A regular cotton would work great.

Pattern alterations or any design changes you made: Obviously I changed quite a bit and I hope you can follow my progress.

BODICE1) I traced the front band and the bodice front on to sewable tracing paper. Then I sewed these two pieces together to make one whole bodice front. This new bodice front is what I will use to do the rest of my alterations.

2) I cut off the "straps" and added 1/4" seam allowance to the "strap" and the bodice where the "strap" would be sewed back on after bodice is pleated.

3) Now for the pleating. I wanted 1" box pleats covering the front. I had to add 2" for each pleat. First I drew 4 (I wanted 4 pleats on each side of the center pleat) lines one inch apart parallel to the center front. Then I started at the center front and added 1" (this would be on the fold so I am adding a total of 2" to the center front) for the center pleat. Next, I cut the pattern on the lines and added 2". I added a total of 9" to my bodice front. Note: before you cut your lines apart make sure you draw perpendicular lines to keep your pattern lined up.

4) To make the pleats: I clipped at the top and the bottom of the pleat. Then I drew lines on the right side of my fabric with chalk on one side of the pleat. Next, I folded the fabric matching the clips for each pleat and stitched on my chalk line. Put a pin in the fold of the pleat. Match the pin to the seamline and press the pleat down.

5) After it was all pleated I reattached the "straps". This completes the bodice front.
SKIRT
This was fairly easy. There was already extra because it was going to be gathered.

SKIRT FRONT
1) In order to get my pleats to match I measured starting at the center front.
Measure over 1" (center pleat) and draw a line parallel to the center front.
Measure over 1" and draw a line.
Measure over 2" (pleat #1) and draw a line.
Measure over 1" and draw a line.
Measure over 2" (pleat #2) and draw a line.
Measure over 1" and draw a line.
Measure over 2" (pleat #3) and draw a line.
Measure over 1" and draw a line.
Measure over 2" (pleat #4) and draw a line.

Measure width of the skirt front. Subtract 9" (this is the # of inches I added for my pleats. ex. 23 1/2" - 9" = 14 1/2"
Measure the width of the bodice front. ex. 12 1/2"
Subtract the width of the bodice from the width of the skirt.
ex. 14 1/2" - 12 1/2" = 2"
The 2" is extra so I folded it out. Now the bodice front matches the width of the skirt front.

The skirt back is altered in the same way that the front. Keep in mind that you are adding a zipper to the center back so leave room.

As I am writing this I realize that this will need visual explanation also. I will be doing a couple of blog posts in the next few days with pictures of the above process.

Other design changes:
I put a ribbon over the seam line all the way around the waist.

Would you sew it again? Would you recommend it to others? Definitely. It is a very cute pattern.

Conclusion: Another fun project. I was so happy with how it turned out. It looks just like I wanted it to. My daughter really liked it too.


As I said above I will be doing a couple of posts that will have pictures of how I added the pleats to the bodice. So stay tuned.

Thanks so much for wading through this long post. Have a great day!

Until next time...